Pages

Friday, July 29, 2011

New ink - Tattoo #2

 I was finally able recently to go get my birthday present.  J has told me that I'm allowed to have 3 tattoos total and here's number 2. Not sure where I would want another, so that thought is tabled for a while. I'd been thinking about this one for over a year - I'm serious about what artwork is going to stick with me for the rest of my life... I've got to say I probably logged in over 30 hours of looking and researching possibilities for a foot tattoo that I liked, but never really found any that I loved.
Good thing we know "johnny 2/3" from Yer Cheatin' Heart in Hermosa Beach. He's an aquaintance of my sister and brother in law and has done a lot of tattoos on people I know, so I felt  good going to him the first time when I got my word bracelet.  The thing is, he's an artist first - he told me he used to travel to cathedrals all over the world to sketch inspiration for some of the t-shirt companies he worked for in his previous career.  I love working with artists of all types and it's amazing how fast he is at understanding what I was describing (both times).  We first have an art consultation meeting a few weeks before the big day and both times I left the art consult feeling like I knew he knew what I wanted.
So here it is. I took this the day of the tattoo. And yes... it hurt WAY worse than the wrist one, which I would qualify as "annoying" pain, but not anything to write about. The actual tattooing wasn't what really got me - it was later in the day! Wow. Didn't expect that.
I'm really happy with the art. And I like how it's placed, too. He's got the branch being very organic, the bright and fine flowers and a tiny bit of grace added in with the swirls. Just what I was looking for.
Happy 35th Birthday, me! (just 6 months later)

Neighborly fabric

Wow. I have GREAT neighbors. One of my neighbors a few houses north just had a baby. I brought over dinner and a little swaddle blankie (40"x40" flannel served on the edges... Best swaddle ever).
They came over to say thank you a few weeks later and saw me wearing G in a sling. "oh, you make slings? I've been looking for a white eyelet sling for so long..." she said. What? I've had a white eyelet sling in my inventory for YEARS that wasn't selling. I tossed it her way, so happy to have a happy home for it finally.
Well last weekend, my neighbor came over again with these fabrics she bought for me downtown! Talk about knowing the way to my heart.

So when I was looking for a nice orange fabric to bind my neighborhood quilt... Well, there was only one option. The spirit of having this Joel Dewberry fabric as part of my quilt is so great that I would have likely used it even if it didn't match! A gift from a neighbor to finish the quilt about my neighborhood? Perfect.

Now. See the gorgeous eyelet next to it? It's so smooth and modern and really luxe feeling. What do I make with it? A shirt maybe? Maybe a dress for Mimi? Line it with another color and use it in it's own beauty for a pillow or quilt back? Hmmmm.
(I'm taking suggestions)

Thursday, July 28, 2011

Paper Piecing - my way (WIP)

I bring this project along with me everywhere I go. Which is why I get asked to describe it so often and I've given many impromptu tutorials on how people can make these themselves - so here's a little glimpse into how my paper piecing quilt is coming along.
I started with a square notepad. A castoff pad of post-it notes also works. This is the same process used for hexagon quilting, but I don't love the look of small hexagons - I've always been a square gal myself - so I adapted the process to squares. I cut scraps of fabric to be about 1/2" square larger than the paper. So the squares are 2.5" square and the fabric pieces are a little bigger than 3" square. (It's easier to err on the side of them being too big.)
Each fabric square gets basted directly TO a piece of paper with big stitches in a bright color which will be removed later. The point is that you're getting a really perfectly shaped square by folding the fabric to fit exactly and then you can sew without pressing. I made a collection of about 100+ of these before I started anything.
Then I had to figure out my layout. I didn't want this to be traditional in any way other than the process, so my design took a long time to figure out. In the end, I opted for some sporatic lines that are separated by sections of white. And not just white, but many whites, creams and off-whites.

The way that I am achieving this look was the only way that I could figure out how to do long stretches.... since I couldn't really imagine bringing along huge long pieces of paper to be the negative space, I am making the white strips out of many small brick shapes. I opted - for visual interest's sake - to make them not square. No particular reason.
The pieces are attached by putting them right sides together and doing a little hand looping stitch through the very top of both pieces. Sometimes I get the paper in there, but I try not to for the most part. Either way, it doesn't really matter.
 Here you can see the back of my quilt. I leave the paper pieces in until they are surrounded on all 4 sides by their neighbors. After that, I can pull the basting thread out and see a little better what it's going to look like.
Right now the quilt is about 50"x30" - I hope to make it 50x60" in the end so that it can be useful and not just decorative.

I've spent so much time working on this in the car, in meetings, and even camping that there are about 100 memories I have attached to it already.  The strongest ones are the ones that involve me waiting outside the office at DCFS for the baby while he has visitations. That's always an anxiety filled time for me, so this quilt has already brought me so much comfort, even before being snuggle worthy.

And of course - it is going to have to be made entirely by hand. I am really excited about that!
I'll keep you posted on it's progress.

Bee Happy Neighborhood Quilt - WIP

Just the binding is left!
I'm finished quilting this King sized Bee Happy treasure. I'm certainly winning NO awards for my stippling on this (sigh). I'm afraid my guild members may kick me out if they see how bad the free motion work is on this, but I have to be honest. I love the idea that I did it myself and I am a firm believer in the proverb "Do not despise the day of small beginnings".
How else will I learn without trying?
So it's not perfectly quilted, but this is going to be a treasure for our family, either way. And I'm not afraid of saying I am still a free motion quilting novice.
I won't always be one!
The binding and label (my kids call them "nabels") are all that's left... I promise I'll post pics when it's done. Like the backing fabric with the hand-drawn houses? It's from Ikea.

Wednesday, July 27, 2011

Store window inspiration for a quilt

When I saw these windows at Anthropologie in Santa Monica a few months ago, I nearly squealed... Were they inspired by a quilt?
Will they inspire me to quilt? (yes)

We've now had Baby 10 months. We got him when he was 3 weeks old. And because it's so fraught with grief and pain, I haven't been able to sew for him like I did for AJ and Ace. My heart is just too broken to go there. I describe it like this, "I lose him every day."

I've made him a little playmat quilt to send along with him. But I've also wanted to make a quilt that helps me process this pain. Especially if he may be leaving us soon. And as I was picking out some fabrics, I started going through my books looking for pattern inspiration.  Then as I was rocking him to sleep, peeking through old photos on my phone, I saw these pics. What great inspiration.  Now I know at least where I want to start.

Tuesday, July 26, 2011

Project Modern Challenge - Modern Quilt Guild

Project Modern
The Modern Quilt Guild isn't just in LA. It's ALL OVER. And the Modern Quilt Guild sponsors some cool challenges and contests... one of which my pal Alison recently won!
(Her quilt was entered into the challenge that was called "ORGANIC" and it's an amazing quilt. Read about it here.
organic quilt entry

The next challenge is one that I am really hoping to get my act together to enter.  It's called "FIND YOUR VOICE" and we are encouraged to use that terminology as inspiration for our own quilt. Find yours and enter too! You have until September 30th. Plenty of time, right?
(I sure hope so!)

Lucky winner

I've never been the type to win anything in giveaways or drawings, but in the past year - and only related to fabric or sewing.... I've won something like 3 or 4 times. (which is a lot for a girl who doesn't consider herself "lucky" - Blessed- YES! But "Lucky"- not very often.)
Well I won again! And not even something I entered... Which is funny. Remember how I posted about "generation Q magazine"??? I commented on their 1st or 2nd day, just piping in about some square or something and they picked me to win a set of books. I love sewing books!
And one of them is even written by another LAMQG member, Jake Finch.
So awesome. Thanks, generation Q!

Oh and this brings my sewing book collection to about 4,654,759. My goal is to try and do at least one project (how sad is that) from each book. Many of them are staples for me with creative inspiration. (I mostly follow images, not patterns) but some get great use. I think I may do book reports on those soon.

In other news: baby is still with us. He was supposed to leave last Friday, but the process has gotten elongated. (which is good so he can at least get to know the people he's moving in with over a few weeks instead of leaving us cold turkey) So he's here in my arms as I write this and though we had a goodbye party for him last Sunday, we are not sure when that day will be.
Thanks for thinking of us. Being a foster family is definitely one of the greatest challenges our family has faced, but it is drawing us together and growing us immensely.

Monday, July 25, 2011

Memories of Friendship Quilt


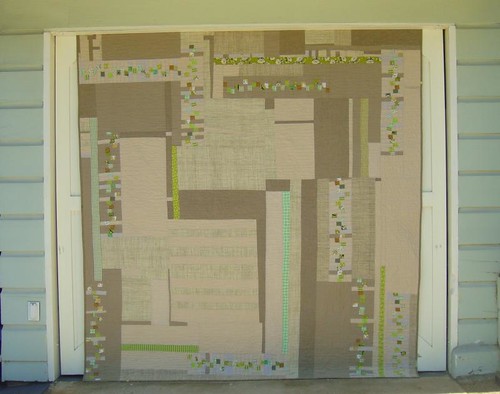
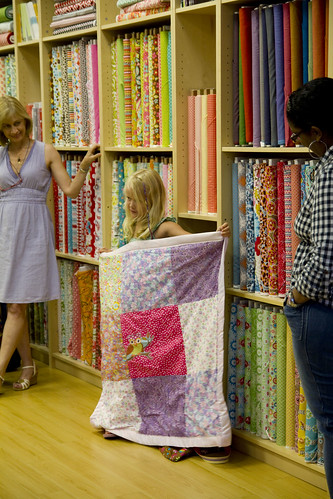
It's finished! And it's not called "The Beast" - but it is called "Memories of Friendship"
I wrote the following note to accompany it as it travels to a friend who is making a presentation on modern quilting and using it (among many others) as a prop.

Memories of Friendship
I made this quilt in stages.
This quilt started as one square with some old fabric and some new friends. We had gathered together to learn how to quilt. The old fabric was part of my eclectic and bizarre stash that I have after years of sewing clothes and collecting vintage fabrics from various elderly friends and family members. Each piece has a memory attached of who gave it to me, where I got it or the mystery of not knowing its history.
I often have a "game" I play where I love to hide what I consider "ugly" fabrics into my work. The idea that this discarded and unwanted fabric could be part of something beautiful means a lot to me on many levels. (I  live in a very old house, with lots of vintage patchwork  quilts, artwork on the walls, a creative family, a rescued dog and a foster baby we're trying to adopt. I love seeing beauty in the unexpected) I almost never quilt with a line of fabric, I like the unexpected, and the sense that no one could possibly make this same quilt.
 My new friends and I made wonky squares. I loved my first one and I used up many precious scraps to get the 5 complementary squares. 6 was all I could get. At one point they were even sewn together as a potential table runner.
Then they were ripped apart and stacked for months.

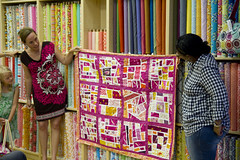
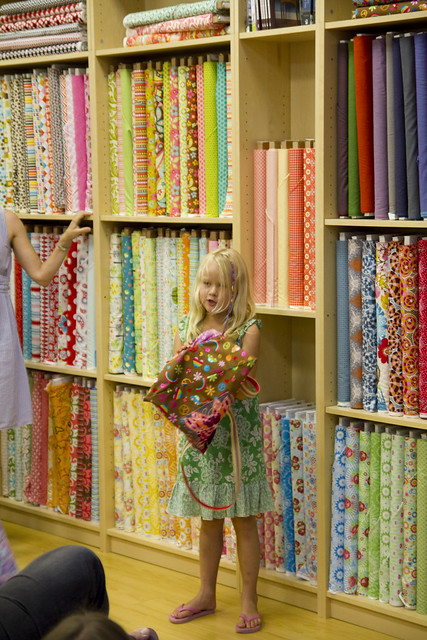
I got the idea to take them into my favorite new quilt shop (Sew Modern), and to pick the brains of the creative and fun friends who work there for ideas. Could we come up with a way to highlight these old fabrics with such a complex color scheme in a way that was fresh?
I'd come in with the idea of two stacks of squares and an off center spread of fabric between. They helped present some awesome and eclectic combos for fabrics, and suggested the wobbly placement.
I went home and pieced the rest by sight. If it needed orange over there, I'd cut and add it in... It was all done in the moment, responding to the overall feeling.
I quilted it with straight line quilting, something I've had little experience with before, but really enjoyed.
As I was basting and quilting this, it occurred to me how many precious friends and memories were represented by this quilt. Each fabric sliver reminds me of someone beautiful that I know. And to me that's what this quilt is all about. My  new friends, my old friends. My silver friends and my gold friends.

 (here's the back of the quilt)

Friday, July 22, 2011

My own quilt labels

Wanna see my quilt label?
Here it is! I've already made 25 quilts that this isn't on, but the next 25 will have this (or something really similar) on the back of them.
The little white box on it is for me to handwrite who it's for and the occasion.
I may also have a less feminine version for quilts that I specifically make for men or boys. Still working that out.
Whatcha think?

Thursday, July 21, 2011

Printing my own Quilt Labels - Product Review

I've been wanting to make some fancier labels for my quilts for a while now.
Though I have heard that I could technically run fabric through my printer if it were ironed to freezer paper (anyone tried that?) - I simply haven't gotten around to it.

A few weeks ago, I made labels for my bee buddies to put on their bee quilts. I didn't want to spend the time waiting to get them back from Spoonflower (where I ordered them last year), so I dug out some printable fabric that I have had on hand for a few years and never used. Point to note: such fabric YELLOWS if you don't use it.
I started with the Printed Treasures paper, which I didn't love because it became SO yellow (it IS old, but still). Then I used June Tailor's line, which was considerably less yellowed.  But still my pattern bled a little bit when I rinsed and heat set it.


After all was said and done, I'd use the June Tailor paper again in a bind, but I am going to order my own labels at Spoonflower.  The quality is considerably better.

Wednesday, July 20, 2011

Bee Happy loves our Bee Babies!

Last year, when Melissa had a baby, the girls from Bee Happy all whipped up some quilt squares, sent them off to Natalie and she finished the quilt so we could present it to Melissa at a LAMQG meeting.

So when we learned that Janice had a baby, it was only fitting that we came up with something for her too. Now Bee Happy is notoriously chill about our deadlines, but we CRANKED on this! It was only about 6 weeks and we had a completed quilt out the door for new baby Emma.

We learned her nursery's color scheme and shared our fabrics and we all made squares in the Mod Mosaic pattern. Lori whipped up the top, Alison quilted it at our favorite shop, Sew Modern, and I finished the binding and label and sent it out the door!

Yay bee girls!

Here's another pic of me showing the almost finished quilt to the guild at our last meeting.
IMG_2430

Tuesday, July 19, 2011

Old Artwork - post 2

I made 4 of these silk stained glass banners to hang in a church we attended in Chicago. They were 5'x6' long and a lot of work, but I hear they are even still in use!

My very first textile design experience was a silk painting and batik class that I took in Florence, Italy one summer. I haven't painted on silk in years, but it was how I got my start, how I got my first job - and I even ended up using my knowledge to write a curriculum that our company used for years on how to teach people about silk painting. 
I need to go dig those supplies up somewhere...  if you're ever offered the chance to paint on silk, it is an experience that is like no other painting. I highly recommend it. These are only the biggest ones I made - I also made probably 30+ other paintings that are in various places and uses right now in people's lives.

The pics below are from 2 years ago when I revisited my old studio in Florence and found my teacher was still there and remembered me! Not only did she remember me, but she had photos of me (completely dorky) with my work. That was a very amazing day for me to revisit this place that 12 years earlier had formed a major foundation for who I was to become.  These pics were really special to take.  The studio was in a converted convent and was exactly how I remembered it.


Monday, July 18, 2011

Old Artwork - post 3

More installments in my "old artwork" series:
I grouped these two together because they may or may not have happened around the same time, but it's clear the inspiration was the concept of embroidering scenery.
 This tiny piece was what I spent a rainy winter weekend on as we escaped the frigid Chicago winter for a visit to Arizona.  We stayed in a friend's vacation home and though it was rainy, the desert was gorgeous and I sat there inside, overlooking the endless pool as it dropped off into the cool and green valley. The desert had never looked so pretty to me.  Even looking at this now, I can remember more senses and feelings than I normally remember about that trip. Isn't that one of the great reasons we make art?
 This piece also was made on a vacation. It was the view of a valley below us at the home we stayed at in Hyderabad, India. I found it so funny that there were boulders in the yards of the homes below that were larger than the houses. I imagined this would be called, "The Boulders Come With the House" - I'm sure that the doors were probably that color, too - knowing India.

Sunday, July 17, 2011

Typewriter jewelry

Recently I got it in my head that I wanted a necklace made out of a vintage typrewriter key. So I popped over to etsy and found a ton of options! But far and away, my favorite was the one that I ended up with. It's made by IvieRidge and I absolutely love it. I wear it all the time and get so many people asking me about where I got it.  Thought I'd share the source and the etsy love.

Saturday, July 16, 2011

Scraps finding a purpose - Rebecca's quilt

Remember how every few months I get freaked out by my stash and send out a call for people who want scraps? Well I LOVE LOVE LOVE it when the recipients send me pics of what they've made. I gave some scraps to a neighbor, Rebecca, and she made this quilt almost a year ago and I keep forgetting to post pics of it!
Well, now I remembered... Sorry to have forgotten this long, Rebecca!


Didn't she do the greatest job? I'm so happy to see these fabrics from my skirts get a fresh and happy life.
If this inspires you and you want some scraps (and are either local to pick them up or willing to pay shipping) let me know and I'll get some off to you!

Friday, July 15, 2011

Old artwork - post 1

I was looking through photos tonight and saw that I have a ton of cool artwork that I did 7-10 years ago that I have never posted about here. So here's installment #1. I made this 8"x10" embroidered skyline of Chicago for an auction. I can't remember who bought it, and I doubt I even signed the piece - but I do remember being so proud that it sold.  This was back in my days as a textile designer when I lived in Chicago and was involved in the interior design industry in the city, so the buildings all meant a lot to me.

These days I wish I'd kept this piece! Or at least taken a better picture of it.

Thursday, July 14, 2011

Another easy camping craft

Here's another craft that I did in about 10 minutes while we were camping. I saw that there were tons of snapped twigs around on the ground in various sizes and spent almost no time collecting these to make our cute little sign.  I think it will end up being framed in our home.

No twigs were hurt (or even broken!) in the making of this art.

Wednesday, July 13, 2011

Camper Camp Crafts

We just went to Sequoia National Park on a camping trip with some other local families.
My responsibility was crafts and t-shirts. When I wasn't sewing in the car or giving their moms quilting lessons, I was making fun projects with the kids.

Though I love crafts and I love kid's art... I despise "puffy paints" and hand-drawn t-shirts that end up only being good for sleep and painting shirts. I knew my access to facilities and materials would be limited, so I tried to think of the best way to assure each kid of a cool shirt.
"Stencils!" i thought... "how could i use stencils?" Lucky for me, since the last time that i decorated t-shirts, a new product has come out.  These Tulip brand spray paints are awesome. They're not cheap - but it only took 4 bottles to make 11 t-shirts and 9 pillowcases - with about 1/3 bottle left over in each bottle.
Any stencil would work, but I wanted a custom one, so I printed out a clip art image I found of an RV and taped it to a discarded cereal box. I used an xacto knife to cut out the design and saved both parts. The RV alone ended up being a cool one for the adults (even the dads wanted them!) and then I drew and cut out the words "CAMPER CAMP" on the rest of the box for the kids' shirts.  Since I knew I would be using the stencil a bunch of times I actually coated both sides with Mod Podge to make it more durable. Acrylic Medium would work too.


Once we were on the trip, we laid down some plastic tablecloths on the ground and we got to spraying. One point to note is that the more intensely sprayed shirts ended up looking better after a wash.  The kids had a hard time working the sprayer, so I had them direct me which colors and how to spray.


Once the t-shirts were a big hit, everyone wanted to move onto the pillowcases that I had asked them to bring. But the girls, who'd been playing fairies in the woods all morning, wanted fairies and mermaids... so I drew and cut out of more cereal boxes some other designs - rudimentary, but all stencils are - I made dolphins, mermaids, hearts, pirate ships and fairies.  They sprayed the body of the pillowcases and used Sharpie markers to write their names along the hemmed edges of the pillowcases.

As I was making them - I realized, not only is this the perfect camping craft - it's also a great one for a birthday party.
I think we will be revisiting this process in the near future. With more fairies.


and just because I can't write about Sequoia and not show the giant trees... Here are some pics for inspiration and size.

(one big Sequoia with two cute 6 year olds.)
(see the tiny people down by the base of "General Sherman"?)

Tuesday, July 12, 2011

WIP- quilting the beast

Okay I am not going to name this quilt "the beast", but it's big enough to earn the nickname for sure.
I was so ambitious tonight. Got my machine out and everything. Then I realized that spray baste doesn't hold awesomely when the quilt is kept folded and shoved in a box for a few months. So tonight I pinned and taped. Maybe I quilt tomorrow night?
(my friend Melissa calls herself the sewing vampire - only sewing after her kids are asleep. I'm the same way. Only I don't know about the blood-sucking part. Maybe a vegetarian vampire quilter?)
Okay quilt. See you tomorrow night. You. Me. Here.

Mimi presents her quilts at the LAMQG

In February, I took Mimi to Sew Modern and as we bought fabrics for my birthday, she picked out a bunch that she wanted to make a bag with. I told her that if she made the bag that she'd get to present it at a guild meeting and that I would let her stay up really late to attend.
Well, you saw the bag. Now you get to see the awesome pics that my guild pal, Nichole, took of the Design Director showing off her work. (THANKS,  NICHOLE!)
IMG_2432

Here she is saying, "This one I designed but I didn't sew it, because I was only 4"
IMG_2434

"This quilt I did everything except for the owl and the binding. My mom helped me with those"
IMG_2436

"Here is my bag. I did everything on it except I didn't do the snap or the button on the pocket and my mom attached the ribbon to the straps for me before I sewed them on"

Everyone was freaking out. She was pretty cute, even if she was my own kid. That little 6 year old got up in front of everyone and said exactly what she wanted to say in front of 60 adult strangers. Talk about proud moments. I was so high on that kid that night. She rocked it.
Then after the meeting she showed me the fabrics she wanted to make a dress out of and asked for a lollipop.

Followers

LinkWithin

Related Posts with Thumbnails